Script Attributes
This is the documentation for the newer ESM Script Attributes. You can find documentation for the legacy attributes system here
What are Attributes?
Attributes are a powerful feature that allow you to expose specific parameters to the editor.
This means you can write code once, then tweak values on different instances to give them different properties. Artists, designers or other non-programmer team members can then adjust and modify them without writing code.
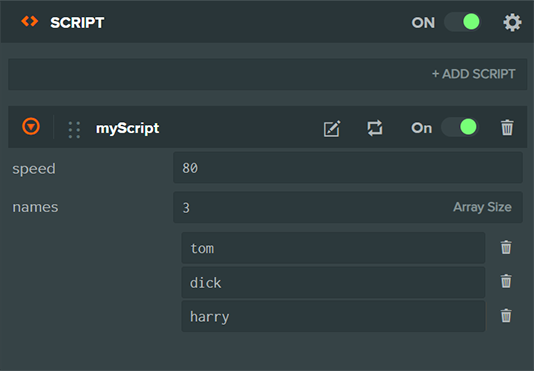
Let's start with a simple rotate script example.
import { Script } from 'playcanvas';

export class Rotator extends Script {
    /**
     * @attribute
     * You can now set the `speed`property dynamically in the editor
     */
    speed = 2;

    update(dt){
        this.entity.rotateLocal(0, this.speed * dt, 0)
    }
}
In this example the script simply rotates the entity according to it's speed, but what value is speed?
The @attribute tag above the speed member promotes it to an attribute. When attached to an entity, the editor creates controls that allows you to dynamically set the value of speed at run time for each entity it's attached to.
What this means in practice is that you can expose various members of a script to the editor and create controls to edit their values at run-time.

Because speed is simply a class member you can access it as you would any other member.
update(dt) {
    this.entity.rotateLocal(0, this.speed, 0);
}
Attributes in the Editor
Once you've declared your attributes the Editor needs to parse the code in order to expose the script attributes. If attributes have been changed, you need to manually refresh the attributes you can click the parse button.

Attribute Information
When you expose an attribute to the editor, you can also surface additional information that helps provide context and present more specific controls. This can help create a better user experiences for your scripts.
Attribute descriptions
The first sentence of an @attribute comment block is used a description in the editor. This is a useful way to surface
contextual information on what the attribute is and how it behaves
/**
 * @attribute
 * Sets the speed of the Y rotation in degrees.
 */
speed = 2
In the editor this is available as a tooltip.

Attribute constraints
What if you also want to define a sensible range values for speed. You can do this with the @range tag
/**
 * @attribute
 * @range [0, 10]
 */
speed = 10
This simply tells the editor that speed is an attribute and it's value should be within 0 - 10. The editor will create a numerical slider mapped to this range.

There are additional numerical constraints that you can set which help the editor limit the set of possible values
/**
 * @attribute
 * @range [0, 10]
 * @precison 0.1
 * @step 0.05
 */
speed = 10
Attribute types
When you expose a script member as an attribute, the editor will show a control thats relevant to the type of attribute. If the attribute is a number, it shows a numerical input, if it's a boolean, a checkbox.
An attribute can be a number, string, boolean, Vec2, Vec3, Vec4, Entity, Asset or Color.
The @type tag
In some situations you won't actually know an attributes initial value ahead of time. For example, if you want to define an asset attribute on a script, you won't necessarily have an initial value. In these situations, where a value isn't known ahead of time, but it's type is, you can use the jsdoc @type tag.
/**
 * @attribute
 * @type {Asset}
 */
myTexture;
An attribute must either be initialized with a value speed = 10, or have a jsdoc type @type {number}. If neither are present, the attribute will ignored
Entity attribute
The Entity type lets your reference another entity in your hierarchy. A great way to link two entities together.
/**
 * @attribute
 * @type {Entity}
 */
target
Asset attribute
The Asset attribute let's you reference a project asset in your script. The asset attribute also supports the @resource tag which limits the attribute to assets of a particular type, e.g. 'texture', 'material', 'model'.
The runtime type of an Asset attribute is Asset. You can reference the resource of an Asset attribute at runtime like so:
/**
 * @attribute
 * @type {Asset}
 * @resource texture
 */
texture

initialize() {
    console.log('This is the texture asset', this.texture);
    console.log('This is the texture resource', this.texture.resource);
}
Color attribute
/** @attribute */
color = new Color()
The color attribute shows a color picker when exposed in the editor. There are two options rgb and rgba depending on whether you wish to expose the alpha channel as well.
Vector attribute
/** @attribute */
position = new Vec3()
The vector attribute can be a 2, 3 or 4 dimension. The editor will show a numerical input for each component, allowing you to set each one independently.

Curve attribute
/**
 * @attribute
 * @type {Curve}
 * @color rgba
 */
wave
The curve attribute is used to express a value that changes over a time period. All curves are defined over the period 0.0 - 1.0. You can define multiple curves, for example if you wish to have a 3D position from a curve defined three curves for x,y,z using the curves property. There is also a special curve editor for modifying colors using the color property.
Attribute arrays
In some cases you may want to expose a list of grouped attributes together. Let's say you have a script that generates a gradient, but rather than having a start and end point, you want to allow users to set an arbitrary amount of 'color stops' on the gradient. In this case you can an array qualifier in a @type tag.
/**
 * @attribute
 * @type {Color[]}
 */
gradientStops;
The Color[] declaration uses the jsdoc type tag to declare that gradientStops is an array of Colors. The editor will interpret in this way, creating a controller that allows you to set multiple Color values in a list.
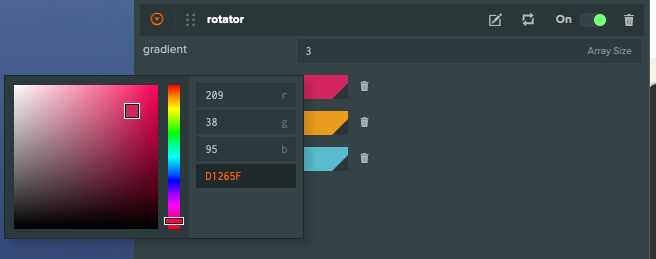
In your initialize or update loop, you can iterate over gradientStops as an array
initialize(){
    this.gradientStops.forEach(color => {
        console.log('This is a Color class', color)
    })
}
Enumerations
Sometimes you may want to constrain an attribute to a set of possible values. In this situation you can use the @enum tag. This uses an enumeration as a value for the attribute making the editor display a combo box constrained to the list of possible values
/** @enum {number} */
const Lights = {
    ON: 1,
    OFF: 0,
    UNKNOWN: 0.5
}

class MyScript extends Script {
    /**
     * @attribute
     * @type {Lights}
     */
    ambient = Lights.OFF
}
This uses the Lights class as an enumeration of possible values. The @type {Lights} indicates that ambient should only have a value listed in Lights. At author-time the editor will generate a drop-down control using the Lights enumeration keys as labels (ON/OFF/UNKNOWN) and setting the corresponding value on ambient. An enumerators values can only be numbers, strings, or booleans.

Conditional Attributes
Every attribute in your script creates a corresponding UI control in the Editor. In some cases, you may want to hide or disable certain controls based on the values of other attributes.
Let’s walk through an example:
export class Delorean extends Script {
    /**
     * @attribute
     */
    power = false

    /**
     * @attribute
     */
    speed = 10
}
This will create a checkbox for power and a slider for speed. But what if we want to prevent users from adjusting the speed unless power is turned on?
We can achieve this by using the @enabledif tag:
export class Delorean extends Script {
    /**
     * @attribute
     */
    power = false

    /**
     * @attribute
     * @enabledif {power}
     */
    speed = 10
}
Now, the speed slider will only be enabled when power is true.
Expression-Based Conditions
You can also use more expressive conditions. If the condition evaluates to a truthy value, the control is enabled.
export class Delorean extends Script {
    /**
     * @attribute
     */
    power = false

    /**
     * @attribute
     * @enabledif {power}
     */
    speed = 10

    /**
     * @attribute
     * @visibleif {speed > 88.8}
     */
    enableFluxCapacitor = true
}
In this case:
- The
speedslider is only enabled if power is on. - The
enableFluxCapacitorcheckbox is only visible whenspeedis greater than88.8.
This allows for rich, dynamic Editor interfaces based on script state.
Example in Action
Grouping Attributes
In some situations you may want to logically group attributes together. For example lets say you have a GameLogic Script with an enemy with the speed and power. Rather than declare the attributes individually, it makes sense to group them together under one enemy attribute. You can do this with Attribute Groups.
Attribute groups are essentially objects that contain sub-attributes:
class GameLogic extends Script {
    /**
     * @attribute
     * `power` and `speed` are exposed as sub attributes
     */
    enemy = { power: 10, speed: 3 }

    initialize(){
        console.log(this.enemy.speed) // 3
        console.log(this.enemy.power) // 10
    }
}
This defines enemy as as Attribute Group. The editor will expose the enemy attribute with nested controllable power and speed sub-attributes. It provides a more flexible way to logically group attributes together.
Attribute Groups allow you to logically group together related attributes into object based structure
There are different ways you can declare Attribute Groups. You can use Inline Attribute Groups or TypeDef Groups.
Inline Group
A simple inline way of declaring attribute groups
class GameLogic extends Script {
    /** @attribute */
    enemy = { power: 10, speed: 3 }
}
TypeDef Groups
This is a more modular way of declaring Attribute Groups. Whilst it is more verbose than using the inline version, the typedef version is more modular and can be used across multiple scripts and attributes.
/**
 * @typedef {Object} Enemy
 * @prop {number} speed - The enemies speed
 * @prop {number} power - The enemies power
 */

class GameLogic extends Script {
    /**
     * @attribute
     * @type {Enemy}
     */
    enemy
}
Interface Attributes
If you want to group attributes together and set individual constraints on it's members you can use an Interface Attribute. This provides a morea more flexible way of grouping attributes.
/** @interface */
class Enemy {
    /**
     * @range [0, 11]
     */
    power = 10;
    speed = 3
}

class GameLogic extends Script {
    /**
     * @attribute
     * @type {Enemy}
     */
    enemy
}
In the above example we've created a new Enemy Interface with a power member constrained within 0 - 11 range. We've also declared that the GameLogic Script has an attribute enemy which is a type of Enemy.
An Interface Attribute allows you to both logically group attributes together and set constraints on individual sub attributes. It also allows you to modularize your code.
Rules of Interface attributes
There are a number of requirements to use Interface Attributes.
- An Interface Attribute must have an
/** @interface */block comment before a class declaration - A Script Attribute must use an Interface Attribute using the
@type {InterfaceAttribute}tag - All public members of an Interface Attribute are available to the editor and will be used. You do not need to use the
@attributetag on each member. - You cannot have nested Interface Attributes.
Interface Attribute Arrays
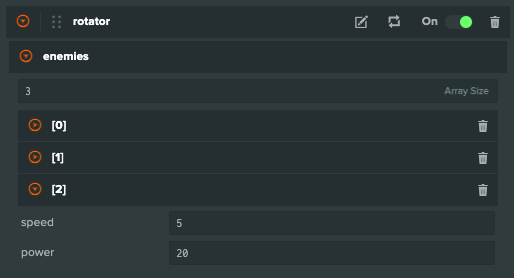
Interface attributes can be used as arrays, just like plain attributes. This means that your GameLogic script can use an array of enemies, each with their own controllable power and speed properties.
class GameLogic extends Script {
    /**
     * @attribute
     * @type {Enemy[]}
     */
    enemies

    update(){
        this.enemies.forEach(({ power, speed }) => {
            this.updateEnemy(power, speed)
        })
    }
}
This creates an array of Enemy controls in the editor, each with it's own numerical controls for the sub attributes